Wednesday, December 4, 2013

Graduation! - An Odyssey in Clay

Mainly because of the Four Friends exhibit in September I was totally ready for the Fusion Mentorship exhibit in October that marked the end of our mentorship with Keith Campbell.  By marking three pieces NFS in the "Friends" exhibit I was able to reserved them for the Fusion exhibit.
Fusion sponsored three mentorships in 2012 -2013. One in Ottawa, a glass one in southern Ontario and then one in North Bay that I participated in titled "An Odyssey in Clay".

The Kennedy Gallery in North Bay is a great space - a small area for intimate shows, along with a gift shop and then a larger area for large exhibits where one can also host a reception. All this is part of the Capitol Center which also has an auditorium, so people can visit the gallery before a show and during intermissions.

Everyone had outdone themselves - I was really impressed. The work was very imaginative, well executed and displayed to show its best. Unfortunately the pictures that I had taken were not very good - my camera did not like the lighting so I do not have any good pictures of the work. Keith was able to make it to the opening - he had finally had his heart surgery just a few weeks before so it was great to see him up and about. His daughter Alex  is the curator at the gallery and she and Keith put together the exhibit.
Thank you Keith for a great mentorship experience and a great show. We are to meet for our final meeting in January to see where we all go from here. I highly recommend a mentorship experience -especially a group one as you not only learn from your mentor but from all the other mentees as well.  It makes for a great group dynamic!
And thank you to Fusion - the Ontario Clay and Glass Association for getting the ball rolling on these mentorships! I hope that many of you will get the opportunity to participate.

Thursday, October 17, 2013

Four Friends, Four Perspectives - Part II

Apart from the "nuclear theme" I had several other themes for the exhibit. I had sort of abandoned for a while some of my themes that I had started in the mentorship program but then returned with "the bottom billion" and the "forest theme"which morphed into the "Ottawa River series". In early April I had attended a talk at a local museum on the Ottawa River and aboriginal archaeology. It really inspired me to think about what it must have been like here over 10,000 years ago at the end of the last Ice Age.
The Ottawa River levels fluctuated rapidly and widely back then, even reversing flow at one time and flowing into Hudson's Bay. I tried to imagine what this very landscape must have been like back then, a cold, white towering world, with rocks, boulders and ice chunks littering the ground. It is now thought that people inhabited this area much earlier than thought, even maybe as long ago as 14,000 years, living and hunting at the base of the glaciers. 
This inspired me to do an Ottawa River series of platters - again over the garbage can type. They were fun to do! I always remember Tony Clennel admonishing potters to reference thier location. I have always wanted to make rocky mountain type scenery, sort of what Les Manning does, but there are no glaciers here! But after that talk on the Ottawa River I realize that I can use glacier images even though I do not live out west - just include an a short write up on what inspired me and voila! The Ottawa River Series with glaciers is born! All cone 10 redux with MD shino over Dan Hill lithium ship (blue areas) or over white crackle slip. Some overspray with magnesia matt (white areas) and edged in Temmoku.


I added black sand stripes to the design, sort of indicating erosion, rocks etc.
However it is hard to apply with a brush and I find my brush stokes rather inept,
detracting from the design - otherwise I was pleased with the overall effect - MD shino over
Dan's lithium slip (top right), then white crackle slip (which did not crackle) for the ice
and then some overspray with magnesia mat.

Same problem with the black sand. Also whole design is a bit Disney like - just too
cutesy - expect Bambi to appear at anytime.

This is the first one of the series that I did. The crackle slip on the ice portions was close to flaking
off so I reglazed with  a cone 6 electric white glaze to stabilize the surface - those are the white
dots which unfortunately are rather distracting in the design.
The theme still needs more work and the glazing effects are not that cohesive, but I am looking forward to exploring this theme more.


Saturday, October 12, 2013

Four Friends, Four Perspectives - Part I

When a friend of mine asked me last spring if I wanted to get together with her and 2 other friends and do a show in the local library in September I said yes. I thought that it probably would not entail that much more work as I would have to have work ready for the mentorship exhibit later in October in North Bay. However the mentorship exhibit requires just three works from each of us - for the library I had a 30 foot long wall to fill. But I like deadlines. In fact I need a deadline to get things done, otherwise I fritter the day  away on various inconsequential tasks. 
The show was a great success - with amazing work by the other three artists (sun dyed fabrics, fused glass, found art and paintings) and lots of great comments and sales. And now that's it over I've been able to catch up on my blogging.
Since Deep River is the home of Canada's nuclear pioneers, I thought I had better do something with my nuclear theme. I would do the cups with various pro-nuclear slogans. I had no idea how I would put them together into a display. I was stumped. Then on waking one morning just a few days before I had a true insight! (Thanks Johan Lehrer!) I would use my GAIA "bricks" that I had wood fired for another project and put them together with various bricks and soaps from my wood kiln and build as "industrial" wall to stand them on. Good thing the table was sturdy as it sure ended up heavy. Not sure if when they were all together like that that the cooling tower concept came through.
Nuclear cooling tower cups for the 45% - % of people worldwide that support nuclear energy

In the front Candu reactor cups for the 36% - % of Canadians that
support nuclear energy. Candu reactors are Canada'system of reactors and they do not have cooling towers.

I added a fat lady holding a Candu fuel bundle with the caption "It's Not Over Until the Fat Lady Sings." However I don't think that anyone got it - i.e. the nuclear option is not over yet.
The display was accompanied by this write up and challenge:
It’s pretty hard to beat a great slogan!
For decades “No Nukes” has carried the environmental movement against not only nuclear weapons but nuclear energy. Nuclear energy in the 1950’s and 60’s was heralded in by its own great slogan, “Energy Too Cheap to Meter”.
But today the fuel rods and bundles have all been put on the back burner by governments around the world and the future of the industry is no longer glowing brightly. I challenge all that support the nuclear option to come up with a new slogan that can fight back and help achieve a sustainable future for our planet.

Sculpture Workshop with Darryl Frost

When Darryl Frost, a New Zealand anagama potter and sculptor, emailed the Ottawa Guild of Potters that he was staying in Ottawa for a few months and would be interested in helping out with a wood firing and perhaps do a workshop as well, the Deep River Potters Guild took him up on his offer of a one day sculpture workshop for the end of August. We started off the evening before with the usual great potluck supper, followed by Darryl's slide show showcasing his wide range of sculptural work and his anagama kiln in New Zealand.  http://playingwithfire.co.nz/about/my-anagama/  This got us all inspired to think in terms of more sculptural pieces. The next day was hands on, and we continued well into the evening- working on our own sculpture, from small abstract pieces to life-sized herons! He also enthusiastically demoed several of his special throwing techniques. Especially interesting to me were his "tea bowls" - made of a very rough groggy clay that he partially opened and then he inserted a ball of smooth porcelain clay and continued opening and throwing so he ended up with a very rough tactile exterior and smooth functional interior. They were fantastic! He is a very loose thrower and it was a great contrast to most of us who are very tight! Everyone agreed the workshop was a great success - that it was great to get thinking more than just "round pots" and several were even inspired to continue to make more sculptures!
Darryl Frost, helped by Jessica Brabant, holds up his series of rough outside, smooth inside
 "tea bowls".
Thanks Darryl -  for a great workshop and have a safe return to New Zealand!


Sunday, October 6, 2013

A Group Effort - Eighth Firing of the Newfoundout Train

Still playing catch up with my blog! With having to focus most of my work during the last part of spring and early summer on producing larger pieces, especially platters, (which do not fire that well in my small wood fired train kiln), I was lacking enough pots for a wood firing this summer. Fortunately a New Zealand anagama firer, Darryl Frost, http://playingwithfire.co.nz/ happened to be staying in Ottawa for three months. He had put out an email through the Ottawa Guild of Potters that he was interested in helping with a wood firing in the Ottawa area. I contacted him and when we went to Capitol Pottery Supply for him to buy some clay, we met a couple of potters from the Ottawa Guild, Marie Hennessey http://www.ottawaguildofpotters.ca/see/gallery/marie-hennessey and John Ikeda  http://www.ikedastudios.com/www.ikedastudios.com/John_Ikeda_Contemporary_Ceramics.html . John does earthenware - exquisitely coloured abstract designs that I have always greatly admired. He said he was ready to explore other firing methods and so they also expressed interest in taking part. Then another potter form Madonna House in Combermere - a religious lay community about an hour away from our farm
was also interested. Perfect!
Now I would have enough pots to fill the kiln - and not only that, Darryl had contact with Mike Doxey http://www.mdoxey.com/mdoxey-pottery.html who has a wood fired kiln about 2 hours way from me and he was interested in partaking as well. Now with 5 people to bring pots and with two expert wood firers to load and fire my kiln I was all set!
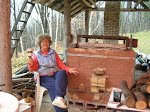
Our "farm" and my kiln is located in "The Newfoundout", an abandoned farming community high in the Opeongo Hills of eastern Ontario. It is off the beaten track - up a very steep, rough road and then just a track slaloming through big rocks in the front fields -so I was a bit apprehensive about cars making it in to the back where the kiln is located without hitting any rocks - but all were not only great potters but superb drivers.
Apart from my very first firing this is only the second time that I had a group firing - and it made the job so much more enjoyable, not to mention easy on the back - plus with overnight shifts we were able to fire longer then my usual 14 - 15 hours.
Almost done loading!
Fire outside the firebox at the start

Firing on the hobs
Darryl loves crusty surfaces - although not my favorite I can appreciate them. He stacked and wadded with seashells and placed his pieces over the channels under the stoking holes where I would never think of placing items- but in the future I think I can make some pieces that would take advantage of this intense ash buildup.
Several things that I learned - bring the temp up much more slowly at the start - even start the fire outside of the firebox at the start - so as not to stress the kiln furniture. I have had lots of problems with the lid shelves on my kiln cracking and that could be why. After just 8 firings that should not really be happening.

They also side stoked at lot more than I would and the temperature was much more even through out. I think it is just too much hard work when one is firing all by oneself to do much side stoking.

Darryl clammed up the kiln at the end with a very runny slip mix of clay and grog and applied it with a brush. I was used to using a thicker mix that I applied with a spatula or by hand which was much more time consuming. He also did not fire down before shutting everything up as I did, as Steve Harrison in his book says that you may end up with reduction cooling if you do.

The results - well we all had some great pots, some failures but all in all a successful firing with results very different from my firings. We had pretty even temps and ash through-out but hardly any carbon trapping. Instead the shinos ending up a very beautiful, lustrous gold!
Thanks everyone for all the hard work and a great firing!
Darryl's crusty sinkers.
Analyzing the results! Lots of ohs and ah and some ughs too! But that's attraction of wood firing!
You never now what you will get!


Sunday, September 29, 2013

Fusion Mentorship April Meeting

It's been such a long time since since I started this April report that I am having a hard time remembering what went on and unfortunately I did not take many notes at the April meeting. I seem to have lost the 4 themes that I was working on - the bottom billion, the dancing girls, the forest, and the nuclear theme and have strayed back onto familiar territory again with people appliques - not really what I wanted but somehow I cannot control it.
I followed up on my face vase with another one but this time the face vase holding a vase - however the facial features really bother me - not what I wanted. Lips are really hard to do hard not to make them look fake.

Woman with Vase - just too much going on - fish area glazed with shino and blue underglaze but vase area was tommuku - I find just too many contrasts. Plus facial features are not appealing - she looks sullen. I was going to make some wilted roses for the small vase but lost interest with the project as not sure what I was trying to say with this.
I tried out two other face vases - but the end result was way overdone! The quick impromptu one was one that I liked best yet could not make myself keep it as it was not really me - sort of hard to understand - maybe not tight enough? I'd give anything to be loose!
Quick impromptu version
Final version - totally overdone - sort of mother earth but put just too much hair, leaves etc..
I started work on some large hand built platters. As I like to cut the edges to end up with irregular shapes handbuilding was the way to go as the rims then remain the same thickness throughout.


First woman platter - again the lips are totally unappealing. Plus some of the applique cracked.
I reglazed it in cone 6 electric, but it is going to the hammer.
I am quite happy with my large platters. I feel that I have mastered the rims quite well - adding an extruded rim.
I make the platter over a garbage can -see earlier post several years ago about garbage can platters.  After laying down the clay slab I roughly lay on the extruded rim and cover everything with plastic to equalize the moisture for a couple of days. As I use a caulking gun type of extruder I have to use really soft clay for the rims so it is really important that the clays equalize before attaching the rim.
Once the clays have equalized and hardened a bit I transfer the whole slab to a smaller circle support - a large shallow glass lamp shade. Only then do I cut the edges, score and slip to add the rim.  Sometimes I have a very clear idea of what I will make - other times I do it on the fly - hoping that it will come out OK.
I have been trying to get the shapes a bit more complex. To add the foot - once the plate is leatherhard I invert on a thick foam cushion. I throw a large ring and slip and score to add it - sometimes curving the foot to flow with the curves of the plate.
In places I need to roll out a slab and then cut it into a wedge to insert under the thrown foot to level it out.


Once I have finished all the rims, if it is a complex design I sometimes start the applique design with paper, 


With the next platter I made my woman holding a platter but of people instead of what I sometimes have done - fish. Not sure what the people on the platter represent, but I really love cutting out the people .

There is a sense of urgency now as our mentorship is nearing the end and we have to have several pots for the exhibit which will be in the Oct - I'm not panicking yet but I am starting to feel the stress as I really do not have anything that I am really pleased with.
Out next meeting was to have been in May or June but Keith is scheduled for heart surgery sometime soon and so we left the date it up in the air. Here 's wishing Keith a successful surgery and recovery.


Sunday, April 7, 2013

Fusion Mentorship - February Meeting

Well I an getting further and further behind in my blogging. Our mentorship group meets every  6 weeks so our next meeting was near the end of February - and with more bad driving weather - but not as bad as in January. It was a rather short meeting as three of our members were away.
I had managed to glaze some of my work as we had had a gas firing at the Guild, though i did not fire the nuclear teapot as I had broken the lid and needed to make another one.
The slab vase with the woman's face I ended up taking the suggestion from the last meeting and used a white glaze and so ended up glazing with white salt.
Glazed face vase with earring and nose stud not inserted yet.

However I just could not limit myself to one colour as had been suggested so that it would look like a stone carving, but had to add some Shaner Oribe  with a bit of Temmoku at the base. I forgot that I had used Bmix, which tends to turn the white salt yellowish as it picks up the iron from the clay. So was not that pleased with the piece. I plan to reglaze in electric with some white glaze over it.

For the Bottom Billion I had added some gold to the piece - this is the first time that I had used this type of china paint and I put on two coats and so a lot of it ran.. This totally obliterated the hands on the piece and it just looked a mess. I will bisque fire it to see if I can make the gold disappear.
The Bottom Billion - with gold lustre addition that ran

The second version of the Bottom Billion with the book (to indicate the book "The Bottom Billion") at the top,  I used a gosu (black) slip for the hands and then some blue slip under the hands. It was all glazed with Malcolm Davis Shino plus some Temmoku on the bottom. There was also a fish that was glued just under the neck and a tap in the middle under the hands - it was supposed to symbolize a tap to turn on the oil well. Well the whole thing did not turn out well - the hands ended up looking like sea anemones, the book on top was kind of lost - just way tooooooo  much going on. However the shino get great iridescence. Will have to revisit this concept from a fresh start.
Second version of the Bottom Billion - standing on an oil slick.
I was going to do a large plate with a woman holding a platter with something that would tie it into the bottom billion. It sat on my bench for a couple of weeks before I just ended up with a face on it. It was done over a garbage can (see post on garbage can platters from several years ago) and I added the extruded rim out of paper clay a few days later. I had some trouble with one of the large applique pieces lifting off - so not sure how it will fire, though I tried to fix it with paper clay. So that was it - I brought the bass player that I had also glazed as it was the only thing that I was really halfway pleased with. I seem to have diverged from my themes. I will have to try to stay on course in the next few months - get back to working as well on the Forest Theme, and the Nuclear Theme. I think that I wil drop the dancing ladies.

Monday, March 4, 2013

Fusion Mentorship - January Meeting Part II

From feedback from the Novmber meeting I tried working on expanding my vase forms to make them more interesting. I was going to make a three part vase - with interlocking and matching sides - and carry out the forest theme from our farm - the virgin forest, the clearing of the land and then the return to the forest.  I did not have a clear picture in my head and the vases did not fit together that well, so ended up making three pots with three separate designs.
Trying for a three part composition of vases - but did not have a clear picture in my head.
One was just the forest trees as I have done before, so I did not bring it to the meeting as I could not really come up with anything new there, but I persevered working on it as sometimes new ideas come up when doing repeats.
Forest vase  again! - but did try to bring out the shape on the left.
The second ended up as bass players as the evening before I had attended the Messiah played by the Deep River Symphony Orchestra and the Choral Group. There were three bass players and the way they played  and stood with their instruments really made for an interesting composition. I ended quite liking that as the pot also flowed with the figures. I left that at home as well as it did not seem to fit into my themes.
The Bass Players - front and back


The last pot with a side panel I had a lot of trouble deciding what to do with and at first I made several holes that went all the way through, but ended up filling them in again. Eventually I ended up with a face of a woman, with a nose stud and earring as I felt it needed to add something a bit more interesting. Besides I like gimmicks.
Homage to Keith
I called it homage to Keith as he wears an earring. The suggestion was that I glaze it all in white so that it looks like it was carved out of stone. It would not be a colour that i would have chosen but we'll see. So this 3 part project did not turn out as I had originally expected - but that is what makes working with clay so much fun.

Saturday, March 2, 2013

Fusion Mentorship - January Meeting - Part I

Well I am well behind in my posts, so I'm playing catch up again.
The January meeting was almost two months after our last meeting in November and with Christmas in between there was not as much time to make work as I had expected. I braved the snowy Saturday morning weather again - with my husband driving this time - to North Bay on snow packed roads but made it on time for the start of the meeting.
Nuclear cooling tower coffee set, but coffee pot needs to match the cups.
With my nuclear theme, I had lots of problems trying to get some sort of clear printed words on the pots. For the teapot I used stick-on stencil letters, waxed  around them, removed the letters and then brushed on black underglaze. It worked very well.

The trouble is I was not able to find small stick-on letters for the cups, so tried the gum arabic, stain/linseed oil method as described in Ceramic Arts Daily but my cups were too dry to get a good transfer - they need be a soft leather hard. So I just ended up writing on the cups with an underglaze squeeze bottle and thin metal tip - not what I really wanted. I glazed them with a clear glaze - and as the set was made of B-mix - it ended up gray - having picked up the iron from the body - which I liked . I wanted it to look industrial. - a safe every day process. Because the teapot did not match the cooling tower cups I decided to make another teapot - this time in the shape of a cooling tower, with a steam cloud for the knob, but did not get a chance to glaze that one for the meeting.

The fuel bundle trivet I glazed in a commercial glaze - Amaco bronze - and it was quite effective as a metallic looking glaze and suited the fuel bundle end section.. However as it was too time consuming to make as a multiple copy unless slipcast it, but I would have to do it in at least two parts. So I drew and xeroxed the pattern and transferred it to the trivets - a faster method though not as effective.visually.
Candu fuel bundle end view
I will need to work some more to see what I can come up with regarding the CANDU reactor as it does not have cooling towers, but a containment building and so the cooling towers representing nuclear energy does not resonate with the Canadian public.

I glazed the three sopranos with my usually stoney yellow, Hannah blue ash and some watercolour green. The blue ended up too stark so I reglazed with some stoney white at cone 6 slow cool electric which toned it down but the colours are all a bit muddy. I keep forgetting that the Bax is not the best for these colours as the glaze does pick up some iron from the clay. I need to use a porcelain or remember to spray with a white slip first. I really like the B-mix for handbuilding - it is really easy to fix seams or add stuff even if things get too hard.
The Three Sopranos
For the Bottom Billion I ended up glazing the pot with my usually Dan Hill blue lithium slip, MD shino and temmoku. The glaze ended up really nice - a bit of golden lustre - as the shino sometimes get, but the hands, with some rutile overglaze did not show up well - look more like a tree. The oil slick is in temmoku with some rutile overglaze spray.
I had made another one on that theme - with a narrower base, a book for the top, hands reaching up again and a tap handle. Again there was just too much info and all the messages got overloaded,plus the hands again did not look like hands but sea anemones.  I've also been lax in taking photos so do not have a pictures of the Bottom Billion pots from that meeting.


Friday, February 22, 2013

Tips for Pulling Handles Off Of Mugs

I think that handles are one of the main skills that separate the real potters from the wannabes, especially on mugs. Almost every time you see a great handle it was made by a potter who had what I would call professional training of several years at a university, college etc.  And most of those have been pulled directly off the mug. I know there are many other types, and lots of those handles are great as well but everyone should have a handle that is pulled off the cup in their handle making repertoire.
I am still working on this. It took me many years to "see" what was wrong with my "pulled first and then attached handle". Three years later I am still working to perfect this type of handle. I suspect that it will always be a work in progress.
One thing that I find is that if you do not time the stiffness of the mug correctly you can easily distort the cup when pulling the handle which may distort again in the firing due to clay memory. This would always discourage me trying to make this type of handle.
In order to be able to attach a handle without distorting the cup when I was learning this type of handle I would keep a variety of fast food cups on hand and stick them into the cup until they fit snugly and make a good seal. For the initial attachment I would put my left hand inside to support the wall of the cup. But once I started pulling the handle I placed a correctly sized fast food cup inside the rim until it fitted tightly. That way - no distortion when applying and working on the handle and less chance of clay memory distorting the cup in the firing. I have a variety of different sized cups on hand for this. Also as a final touch I rotated a tightly fitting cup inside the clay cup to "set" the roundness of the rim.

Many tips also mention tapping the end of the handle to compress the butt end. You can do this with your forefinger, or tapping on the table or use a wooden paddle. For a long time I just did not see the reasoning behind this until it finally hit me (duh!!). The more compressed the clay, the smaller the distances between the particles and so the less they will shrink when drying - so this prevents cracks from developing at the joint.
Tapping to compress the end of the handle prior to attachment

Pulled handle pugs prior to compressing on left and after compressing
 on right - note its oval shape and smooth edges of the butt end.
Rather fuzzy pic - but it shows the scoring that leaves an unscored
edge all round the butt end.
Another tip is not scoring the butt end right to the edges. This way you have a solid "rim" around the butt and when you apply it it leaves a slight crack with smooth rounded edges all around. You can accentuate this with a pencil after you have attached the handle and it has set up a bit.This slight crack tends to fill with glaze - and depending on the glaze will nicely emphasize the join.

I never score the bottom join and never compress it either and never seem to have problems on the bottom join. I always cover the cups overnight and after that air dry them. - even speed stuff up after that in the oven or kiln with no cracking.
Three cups with the pulled handle

So after three years I find that I have finally managed to put on handles with this method just as easily and fast as those that are pulled first but they look so much better - they seem to grow more out of the cup. However looking at the above three pics I think that they still need work - they seem to stick out a bit too much. It is hard to make them comfortable for two fingers yet look stylish.

Right now I seem to have gotten into a rut in the shape and style of pulled handle off the mug. My next goal is to work on the blended handle - where the join either top or bottom or both are fully blended into the cup. I really love those, but they are more time consuming to make, though well worth the effort.