Friday, September 3, 2010

Chug Chug - The Train Pulls In

I love the sound my train kiln makes right after stoking the bourry box. The flames gulp air through the
primary air holes in the lid making the characteristic chugging sound - definitely a sign of reduction.

This time I had lots of reduction in the top half and it seemed to be along the whole length - though it varied, just like the flame signs were one directional. The Shaner oribe turned red, the VCAA green turned a purplish.
I had made two small appliqued vases to test out how they would react to the flames and to the soda.
In the wood only section I had used the watercolour green to highlight the applique then rubbed off and gave it a light spray with bone ash glaze. The bone ash did not react well with the ash - going a grey colour and a sugary white where hit directly.
Bone Ash glazed with a spray of watercolour green on dresses. Left side faced directly into the flames and so turned very grey. Right side had more of a warm colour where it was protected from the ash.

In the soda section the pot had Dan Hill's slips - blue, blue green and rutile, with a light spray of Hanna blue ash on the right upper side. The back had some nice blushing.


Jar from throat arch - lid no longer fits as it had sealed with ash when it got knocked sideways.

I had made some large bottles as it was the quickest way to fill up the kiln. I was a bit worried that it would block the flames but that did not seem to be the case though the large covered jar in the throat arch got knocked over so that may have helped open up the flame path.
 
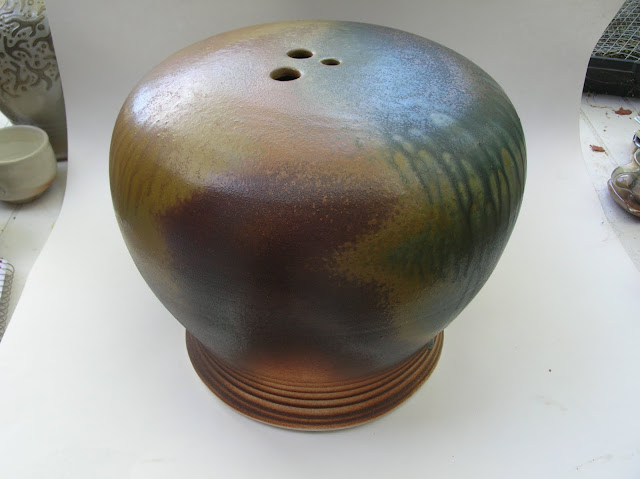
The flat topped orb - had some nice flashing and crystal development on the top - so the slow cooling helped. It was on the bottom just behind the throat arch. It had Aerni colour active blue and brown slips and then glazed with Hanna blue and ochre fake ash glazes with over sprays of rut/GB and Ti/GB.
 
 
The tall bottles were side by side at angles to each other. The Hanna ochre ash glazed one had a bit too much olive green colour where it was hit with a lot of ash. The other one was glazes with mal Davis shino - but was too thin - as no carbon trapping. However the colours were a very warm orange an reds. Not very professional photos as I did them outside and did not have a large enough back drop.


Second Woodfiring in the Newfoundout Kiln

Although it was two months later than planned, I finally managed to get in my second woodfiring at the end of August in my train kiln. I had made a few changes - added an inner row of hard brick on the top on the pot chamber, used two hard brick slabs - 12 x 24 x 2 1/2 for the first part of the kiln roof,- all of that adding extra mass.

First three wood fired stoke sections- mostly glazed
I also used extra insulating bricks on the lid - as well as an old kiln lid that was 4 inches of insulating brick, as well as a fibre blanket and some old fibre sections wrapped in aluminum foil. I also tried to use soaps where ever possible and added extra bits of shelves, bricks, etc in the stacking to also add mass - all of these to slow down the heat loss - not only between stokes but for cooling as well.

Lid covered with lots of insulation - 6 1/2 inches of insulating bricks near the chimney.
Cone 11 was flat near the top in the first stoke hole and cone 9 starting on the floor near the flue exit. This was much better than the first firing. The firing took 13 1/2 hours and then two hours to burn down the coals before clamming up. All in all very manageable for one person to fire. Unfortunately the clay boat holding cone 012 exploded, resulting in shards in many bowls.


I also used about 1/2 pine and cedar instead of just ironwood which in my first firing had caused too many coals to build up.
This time I glazed most of the pots except for some in the last two stoke sections where I added soda. I placed some small dishes with soda ash when stacking as well as soda/sawdust burritos- the burritos did not work very well as there was still a lot of soda ash left on the floor of the kiln. Some of the dishes boiled over with soda. I also sprayed in some soda.
I did some side stoking - just in the last three stoke holes - maybe a total of a large armful of sticks. Next time i will try no side stoking as that tends sto knock over pots.

Reloading the bourry box - pulling on counterweight lid

Next firing I plan to add more mass to the side walls of the pot chamber especially in the front - maybe that will even out the heat from front to back even more.

Roll up ..er down - the Rim

Sisters - in their  Sunday Best - extruded paperclay square coil on inside to thicken rim
Slab built vases always tend to have weak rims unless you make the slabs thick. Since we pay by the pound for firing at our guild I try to use thin slabs but this leaves me with a very thin rim that somehow looks unfinished and weak. I have tried adding extra slab strips to the rim but would get cracking at the joins especially in the corners. Then I started using a soft clay coil so that there was no discernible join in the corners, roughing up the top seam and filling in with extra clay - still some cracking but just in the top seam. I then switched to a soft paper clay coil and that seemed to eliminate the cracks, however I did have trouble getting a crisp edge.

Rolled down rim - punctuates rim
 The best was extruding a length of paper clay using my clay gun and the small square die. "The Sisters - in their Sunday Best" - has got a rim produced that way. As the back was higher, I needed the rim to show crisply on the inside. 
Another method that I tried was rolling and thus compressing the rim with a mini rolling pin - a method that was suggested to me by Steven Hill in one of our journey workshop sessions. That worked for the small handbuilt box but for large pieces as my slab vases it did not result in a sturdy nor thick enough rim for me. Perhaps if the slabs were softer when I rolled them it would have given thicker results.

But for now it's paper clay and a clay gun  for the slab vases.